Instant Pot Greek Yogurt
Thick and creamy, this easy recipe for making yogurt in your Instant Pot will have you wondering why you ever bought it from the store.
Ingredients
- 1 Gallon Milk I use 2%
- 1/4 cup Plain, unflavored yogurt with LIVE cutures
- 1/2 cup water
Instructions
The Prep
-
Sterilize your Instant Pot by pouring your 1/2 cup of water into the pot, then sealing it up. Make sure that the valve is close, then press the "Manual/Pressure Cook" button so that it reads 2 minutes. After it finishes the 2-minute cycle, let your Instant Pot naturally release pressure. Then, pour out the water and dry the basin with a clean paper towel.
-
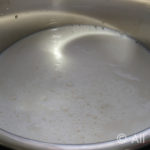
Pour the entire gallon of milk into the pot and cover it. It doesn't matter if you close up the pressure valve or leave it open; you can also use the lid from a stove top pan or crock pot, if it fits.
-
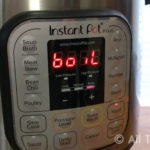
Press the "YOGURT" button on your Instant Pot until it reads "BOIL". It will begin heating the milk to the appropriate temperature, which should take roughly an hour. After your Instant Pot beeps, check the temperature of your milk with a thermometer. The milk needs to reach 180°F. Repeat the boil cycle again if needed, which will be much shorter this time. Mine usually takes 2-3 cycles before it reaches the proper temp.
-
Once your milk has reached 180°F, it's time to cool it off. You can do this by letting the inner pot sit on your counter until it reaches somewhere between 95°-110°F. If you're in a hurry, you can set the inner pot in a sink full of cold water, which usually takes me about 15 minutes.
-
Return the inner pot to your Instant Pot and whisk in your yogurt starter. If you've bought one of those little single serve cups of Chobani or Fage or similar, use about half of the cup. Replace the cover on the pot, and press the YOGURT button again. This time, it will change to a time setting, starting with 8 hours (8:00). The lower the time, the thinner your yogurt will be at the end, and the longer it goes, the more "yogurty" it will taste. I've found that 14 hours is just right for me, yielding a thick, tart batch of yogurt. Note that the timer during a yogurt cycle counts up, not down.
-
After your Instant Pot has run through the complete yogurt cycle, remove the inner pot and set it to cool in your fridge for at least 4-6 hours. This will firm up the yogurt. I don't recommend trying to strain it right away.

-
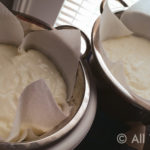
At this point, you can strain whey from the yogurt. Some people suggest using a nut bag to strain it, but I prefer to just line a couple of strainers with coffee filters and paper towels, and set the strainers in mixing bowls.

-
Use a ladle to spoon the yogurt out of the pot and into the strainers. Return the yogurt to your fridge, letting it strain until it has reached the desired thickness. One batch of yogurt will net me about three strainers' worth of strained yogurt, which is about 8 cups after I strain it. I've strained it for up to 24 hours, which yields a very thick, almost cream cheese-like yogurt, but 6-8 hours seems to be a pretty good start for your first batch.